Traduction iXpath (to be deleted Later
Definition:
iXPath is a B2B integration platform in SAAS (software as a service) mode allowing to link the information systems of our customers to those of their various partners but also to manage the internal information flows of the company.
iXPath offers complete and secure management of data exchanges regardless of the communication protocols used and the file formats to be processed.
iXPath provides its customers with a web portal service dedicated to identified data flows. In addition to traditional EDI flows, the iXPath portal enables an ordering party to quickly deploy flow automation to all its partners, regardless of their size and technical capacities.
Different business processes are modeled and can be adapted according to the needs of our customers
Order to Cash: Sales order, Delivery note, Invoicing
Logistics flows: reception, preparation, stock image, stock movements
Order Entry: online order entry, acknowledgment of receipt, delivery note
Process specific to the client's activity
iXPath adapts to your business processes and is configured according to the desired management rules.
The Dashboard:
The dashboard contains a vertical menu that contains shortcuts to the main modules of the application. This table allows the consultation of filters, statistics adapted to the needs of the user.
Documents page :
The "Documents" page of the iXPath application consists of displaying and managing the filters, in fact a filter is the set of parameters selected by the administrator or privileged user to do a search in the Tracking.
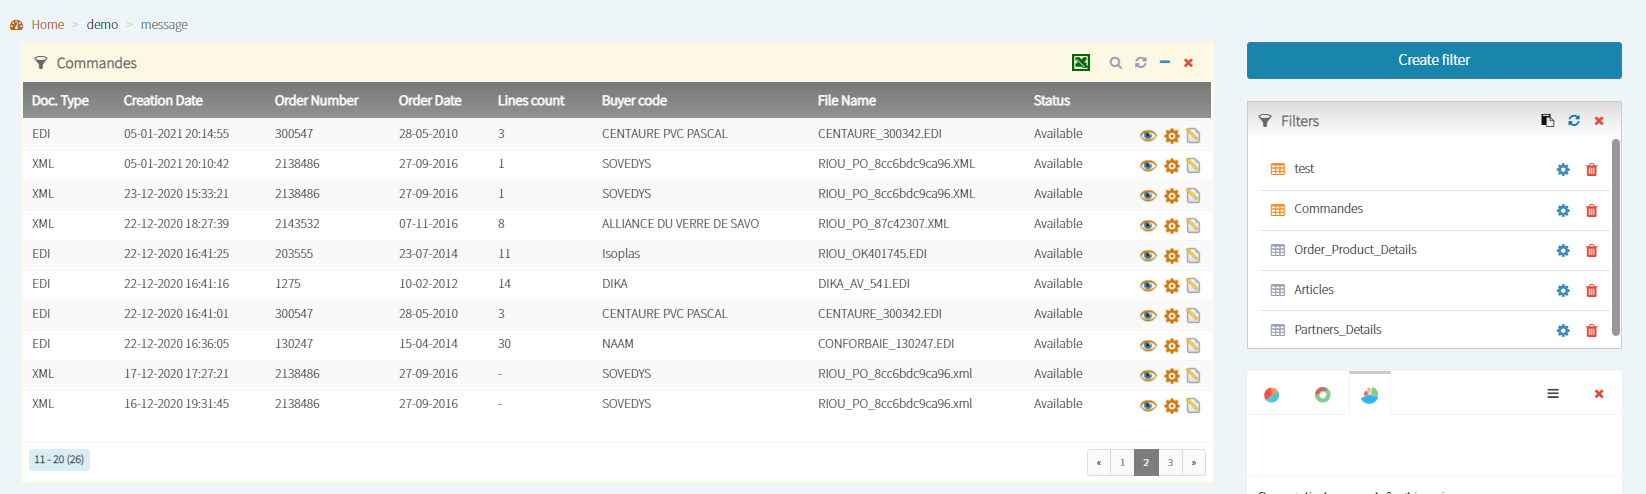
The filter results are displayed in a table format that contain several Tracking lines.

This window represent a list of filters with their setting management (Add, Edit and Delete).

Window which displays data statics that are linked to a predefined filter with setting management.

Window that displays additional information about a slected Tracking from filter results.
Filters creation:
The cration of a filter goes through several tabs : Globall, Criteria, View, Buttons, Statistics and Calendar.
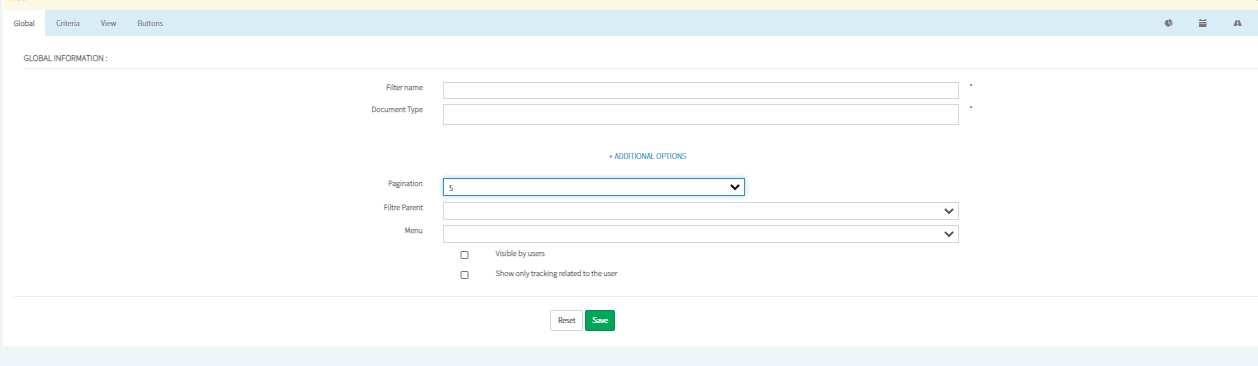
The "Global" tab fields allow to identify the filter by its name, envitonnement and the types of documents that belong to it.

The "Criteria" tab allows to add the search criteria for the creation of the filter, you can add one or more criteria while combining the different types of the documents, data and values.
The added criterias are displayed in the right part of the "Criteria" tab with the "Delete" button that allows you to delete a criteria.
CAPTURE
The "Display" tab allows to select the fields to be displayed in the filter result, it also allows to set several options and settings to reorganize the columns and display the filter in customized formats.
Data redefinition consists of assigning other data types to a selected field when combining several document types in a single filter
CAPTURE
"Buttons" tab consists of adding buttons to a filter that allow to perform certain actions on the whole filter data or specifically on a single row of the filter data.
Section "Active buttons" allows the identification of the button by an alias, its position and other options.
To associate an icon with a button, we have two options: either we add it via the "Download icon" button or we select it from a list that is displayed via the "Icons" button.
The added button is displayed with its icon, its alias and its action.
CAPTURE
On the filter, we recognize "Top Buttons" which is moved to the header of the filter and executing actions on all data of the filter.
CAPTURE
There is also "Line Buttons" that are moved to each line of the data in the filter and it only executes actions of that specefic line.
CAPTURE
The "Actions" section consists in defining the action(s) to be executed by a button, indeed each type has specific fields to define its settings.
These are the following actions:
CAPTURE
CAPTURE 02
"Statistics" tab allows you to set up the data statistics of a filter. There are 6 types of graphs:
- Histogram
- Curve
- Radar
- Segments
- Ring
- Polar zone
CAPTURE
"Calendar" tab allows to display the number of tracking on a determined period.
Modification of filters
You can modify a filter by clicking on the "Modify" button.
Indeed, this operation goes through the same tabs when creating a filter.
Capture
Deleting the filters
In order to delete a filter, click on the "Delete" button.
Confirm the deletion by clicking on "Continue" in the confirmation message.
CAPTURE
Capture
This is a monitoring tool that displays all the jobs processed during an EDI file translation.
Job Research
This part consists of identifying the different "Jobs" that have been carried out in a defined period and in a specific environment.
The Job search is a combination of several criteria with operators and search values.
Capture
To perform a search :
Select an environment if there are several ones.
Choose the criteria.
The result is found on the list Jobs.
Each job has its sub-jobs and its parent job.
In fact, you can display the hierarchy of the Jobs via the icon ![]() .
.
The Job action buttons allow you to upload incoming files, intermediate files converted to XML and the outgoing files.
CAPTURE
File Search :
You can search for a file that has been used in a job by its name and type.
CAPTURE
The "Display history" checkbox includes all files that have been passed through the conversion from the initial stage to its final.
The action buttons allow:
- Download the file.
- Show linked documents via a filter.
- Show linked jobs.
CAPTURE
This interface allows you to manage environments and sub-environments.
Each environment belongs to its parent environment. - The "Activation URL" option allows you to send an email containing an activation URL for the account of any newly created user.
CAPTURE 01
CAPTURE 02
Labels :
CAPTURE
This module allows you to manage aliases and labels, you can actually link the labels to their aliases which define the fields.
To display a field, we first look for its label, otherwise we display its alias.
In the "Labels" interface, there are the following boxes:
- Display of all aliases with action buttons.
- List of alias tables with the total number of aliases and the total number of empty aliases in each table.
- List of all labels with action buttons.
- Label search area.
- Label Info" box that displays the ID and aliases related to the tables.
- Associate / Unlink an alias:
To assign a label to an alias, select it from the list of labels and click on the "Associate" action button
To unlink an alias and a label, click on the "Unlink" button
- Add / Modify / Delete label:
To add a new label, click on the button "New Label" which also allows you to link it with an alias.
The label is made up of two fields, French and English.
You can change or delete a label by clicking on the action buttons in the "Labels" list
CAPTURE
The Tracking editor consists of creating and managing the different types of tracking, in this interface there is a table of tracking and a table of data.
- Types of tracking:
In the Tracking table, we can see :
The Tracking Alias.
The type.
Volume: Total number of records per Tracking type.
Threads: Total number of threads.
Data: Total number of data related to the Tracking.
Tracking label.
To add a Tracking, click on the "New Tracking" button and fill in the form that appears at the bottom of the "Tracking" frame.
The action buttons of the Tracking frame
- Add / Modify Tracking buttons
Allows you to add or modify a button related to the type of Tracking by assigning an action to it.
A form is displayed that is similar to the one for creating filter buttons.
- Show linked Tracking
This button displays the list of Trackings linked to the selected Tracking with the relationship type "Parent" or "Son".
CAPTURE
- View Tracking Data

This button displays the list of data related to the selected Tracking with their details, e.g. field format, indexed or not ...
CAPTURE
- Modify label / Delete Tracking
You can modify the Tracking label by clicking on the "Modify Label" button. The "Label" field becomes an editable text box.
The second button allows you to delete the Tracking.
The deletion of Tracking that is linked to other elements "Linked Tracking, Linked Data, ..." is only possible after these elements have been deleted.
- Data types:
The data types allow you to define the fields that make up the Trackings.
To add a new data type, click on the "add" button and fill in the text fields at the end of the frame: Alias, Label Fr, Label En.
CAPTURE
To link data to a Tracking :
- Display the data linked to the Tracking.
- Click on the button "Link a new data".
- Fill in the line at the bottom of the frame that contains the list of data aliases, formats and choose whether the field is indexed or not.
The interface also contains two zones to search on Tracking and on data by alias.
CAPTURE
The form editor consists of creating and managing the forms used in the Tracking filters.
To add a form, click on the "New Form" button
After that, the user goes through 4 tabs:
- Global.
- Sections.
- Buttons.
- File.
a- Global tab
This tab consist of assignning to a format an alias, type of document (Tracking Type) and an environnement.
b- Section tab
A form contains one or more sections. There is always an "Information" section, which exists in all forms.
In general, there are two main types of sections: Filter and Data.
CAPTURE
- Number of Columns : indicates the number of columns in the created section.
- Image : indicates if the section is an image when uploaded by the component at the form edition level.
- Section column : indicates in which column the data will be displayed.
- Color : it's the color of the displayed field
- Mandatory : the field is mandatory to fill in.
- Modifiable: indicates whether the field can be changed or not at the editing level.
b- Buttons tab
In this tab, the administrator can add buttons to the form that perform actions.
CAPTURE
- The user finds the buttons created by the administrator when the registration is displayed.
- The buttons are displayed with their labels, e.g.: "Add Supplementary Doc" "Close" "Submit Purchases".
- The display of a button is linked to the Tracking status.
- If a user opens a form under modification, it is locked from the others.
d- Tab File
In this tab, the administrator specifies whether the registration can contain files or capture an image as well,
CAPTURE
It can also specify:
- The type of files.
- The download folder.
- The Mask, that is the extension of the files.
- The direction of the files: input file, output file or both directions.
- The maximum number of files to attach.
- The attachment of files or the capture of images is done in the "modification" mode of the form.
- The files are displayed on the left side of the "Information" section of the form.
- The file management buttons that were activated when the form was created.
- At the end of the file attachment, the form is saved.
CAPTURE
This interface is used to define the default display of the filter. Indeed, a filter can contain one or more data types (Tracking Type).
Thus, this form allows the administrator to specify which type of data will be displayed by default in the filter on a given environment.
The "Global" option specifies whether the default filter will be applied to all sub-environments.
CAPTURE
The Data Editor allows you to create a DataList and to assign a list of values to it.
This list is usually used in the forms that have been created before for the modification of the Trackings.
CAPTURE
This interface is reserved for administrators and generally allows to execute a set of actions that are gathered in a system button.
E.g.: Sending a confirmation mail, running a script, ...
The system buttons are :
CreateUserBtnID : we assign actions to execute when creating a user
ModifyUserBtnID : we assign actions to be executed when modifying a user.
DeleteUserBtnID: we assign actions to be executed when deleting a user.
CreateEnvBtnID: we assign actions to be executed when creating an environment
ModifyEnvBtnID: we assign actions to be executed when modifying an environment
DeleteEnvBtnID: we assign actions to be executed when deleting an environment
CAPTURE
The "Permissions" module allows you to manage the access rights and the privileges of administrators and users.
These rights define which users are allowed to access the different modules of the application and also the detailed functionality of each module.
Access rights are assigned to hierarchical groups (see Sec. 2.4.1. Group Editor), so a child group can only inherit the rights of the parent group.
CAPTURE
For technical issues, the end user can contact the iXPath support team through the technical issue management interface or at support@ixpath.com.