XMLToExcel
I- Introduction
The "XMLToExcel" connector allows you to transform an XML file into an Excel file following a given format.
The connector uses the Apache POI library to perform the transformation.
Here is what you can do very easily (You can do much better by making the view much prettier 😊):


Let's get to the heart of the matter.
II- Parameters & Templates
Parameters
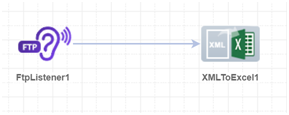
You will find the "XMLToExcel" connector in the connectors palette:

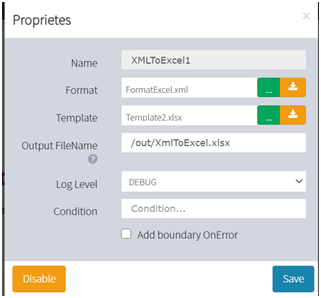
Here are the parameters of the "XMLToExcel" connector:
- Format: The format that specifies all the visual parameters of the document
- Template: A Template file can be specified pre-filled with images / shapes… ==>  Parameter not required.
- File name: The name of the output file.
- Input file: The input must take the form's format.
Templates
The connector will be based on a Template if exist, otherwise it will create a new Excel file.
The Template parameter is optional.
III- 1st Example: File with a template containing datas
Template
Below the following Template: An Excel file with two sheets (Preamble and Jobs)
- Preamble :

- Jobs :

The “Jobs” sheet contains a conditional display in the status and duration column:
- Status “OK” will be displayed in green
- Status “KO” will be displayed in red
- status “Warn” will be displayed in orange
- Time greater than 500 seconds will be displayed in red.
/! Important\
The new version of the XMLToExcel connector forces us to delete cells in the template before inserting data. The new version uses streaming's data and it uses no resources (RAM - CPU...)
Output File
In this example, we want to generate this Excel file :

And a filled data table :

Datas will be inserted into the Excel file taking into account the initial format of the Template (including conditional display)
File format
The format file used for this transformation :
<iXDoc>
<styleSheet1 styleSheetName="Preamble" actif="true">
<Preambule type="table">
<Date beginLine="4">
<value column="E"></value>
</Date>
<Description>
<value column="E"></value>
</Description>
</Preambule>
</styleSheet1>
<styleSheet2 styleSheetName="Jobs" >
<Jobs type="table">
<Job beginLine="3">
<JOBID column="B" formatType="numeric" ></JOBID>
<DESCRIPTION></DESCRIPTION>
<DURATION formatType="numeric" ></DURATION>
<STARTDATE></STARTDATE>
<STATUSTYPEID formatType="numeric"></STATUSTYPEID>
</Job>
</Jobs>
</styleSheet2>
</iXDoc>
Input File
The input file used for this transformation is :
<styleSheet1>
<Preambule>
<Date>
<value>27/04/2021</value>
</Date>
<Description>
<value>Generated dynamically</value>
</Description>
</Preambule>
</styleSheet1>
<styleSheet2>
<Jobs>
<Job>
<JOBID>227140</JOBID>
<DESCRIPTION>Session 227140 : FTP - R-LIV-076597601-3.XML</DESCRIPTION>
<DURATION>164</DURATION>
<STARTDATE>2021-01-20 13:13:01.0</STARTDATE>
<STATUSTYPEID>0</STATUSTYPEID>
</Job>
<Job>
<JOBID>227141</JOBID>
<DESCRIPTION>Received file : /R-LIV-076597601-3.XML' from : 'FML_REPORT</DESCRIPTION>
<DURATION>130</DURATION>
<STARTDATE>2021-01-20 13:13:01.0</STARTDATE>
<STATUSTYPEID>0</STATUSTYPEID>
</Job>…
</Jobs>…
Note that those datas can be retrieved dynamically from a BDDToXML connector for instance.
Format explanation
The file format and the input file begin with an iXDoc node, followed by "Sheet" type nodes. Each "Sheet" node must contain attribut: type = "Table" or type = "Chart", in the example above, we have the sheet "Preamble" which contains small tables. Here are the properties encountered:
| Properties | Description | Example |
|---|---|---|
| styleSheetName | The name of the Excel document sheet, mandatory value. If the sheet does not exist, the connector created it with the name of the property | styleSheetName= " Preamble" |
| actif | Designates whether the page should be active when opening the document or not. This property only exists for "sheet" type tags (which have the "styleSheetName" attribute) | Actif = "true" |
| type | The type of the sheet element, either "table" or "chart" | Type= "table" Type= "chart" |
| beginLine | The start line on the chosen sheet | beginLine="4" |
| column | The start column (in letters) | column= "B" |
| formatType | The format type of the file's cell | formatType= "numeric" |
IV- Example 2 : File with a template containing data and graphs
Template
In this part, we want to create a simple Excel file with graphs. Here are the Templates we want to have:
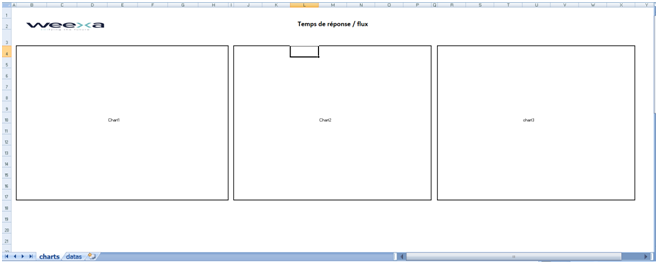
- "charts" sheet: which contains charts created by the iXPath connector.
- "datas" sheet: which contains the appropriate datas.

OutputFile
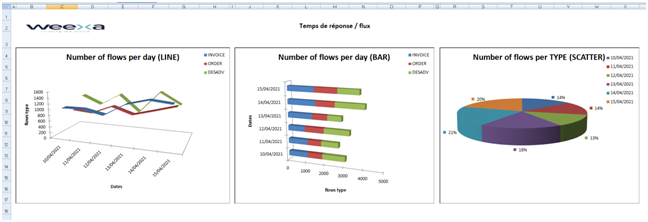
The "Charts" sheet:

The "Datas" sheet :

File format
<iXDoc>
<styleSheet1 styleSheetName="datas">
<Exemples type="table">
<Header beginLine="5">
<Date1 column="C" bold="true" color="red" ></Date1>
<Date2 column="D" bold="true" color="red" ></Date2>
<Date3 column="E" bold="true" color="red" ></Date3>
<Date4 column="F" bold="true" color="red" ></Date4>
<Date5 column="G" bold="true" color="red" ></Date5>
<Date6 column="H" bold="true" color="red" ></Date6>
</Header>
<exemple>
<Date1 column="C" formatType="numeric" ></Date1>
<Date2 column="D" formatType="numeric" ></Date2>
<Date3 column="E" formatType="numeric" ></Date3>
<Date4 column="F" formatType="numeric" ></Date4>
<Date5 column="G" formatType="numeric" ></Date5>
<Date6 column="H" formatType="numeric" ></Date6>
</exemple>
</Exemples>
<Exemples2 type="table">
<Header2 beginLine="5">
<Date12 column="J" bold="true" color="red" ></Date12>
<Date22 bold="true" color="red" ></Date22>
<Date32 bold="true" color="red" ></Date32>
</Header2>
<exemple2>
<Date12 column="J" formatType="numeric" ></Date12>
<Date22 formatType="numeric" ></Date22>
<Date32 formatType="numeric" ></Date32>
</exemple2>
</Exemples2>
</styleSheet1>
<styleSheet2 styleSheetName="charts" actif="true">
<chart1 type="chart" AreaRange="3-17-B-I" sheet="datas" chartType="LINE3D" horizontal="true" bottomAxisTitle="Dates" leftAxisTitle="flows type" legend="Number of flows per day (LINE)" ></chart1>
<chart2 type="chart" AreaRange="3-17-J-Q" sheet="datas" chartType="BAR3D" horizontal="true" bottomAxisTitle="Dates" stacked="true" leftAxisTitle="flows type" legend="Number of flows per day (BAR)" ></chart2>
<chart3 type="chart" AreaRange="3-17-R-Y" sheet="datas" chartType="PIE3D" bottomAxisTitle="" leftAxisTitle="" legend="Number of flows per TYPE (SCATTER)" stacked="true" ></chart3>
</styleSheet2>
</iXDoc>
Input file
<iXDoc>
<styleSheet1>
<Exemples>
<Header>
<Date1>10/04/2021</Date1>
<Date2>11/04/2021</Date2>
<Date3>12/04/2021</Date3>
<Date4>13/04/2021</Date4>
<Date5>14/04/2021</Date5>
<Date6>15/04/2021</Date6>
</Header>
<exemple>
<Date1>1033</Date1>
<Date2>1042</Date2>
<Date3>900</Date3>
<Date4>1313</Date4>
<Date5>1502</Date5>
<Date6>1432</Date6>
</exemple>
<exemple>
<Date1>801</Date1>
<Date2>743</Date2>
<Date3>1032</Date3>
<Date4>802</Date4>
<Date5>998</Date5>
<Date6>1203</Date6>
</exemple>
<exemple>
<Date1>1203</Date1>
<Date2>902</Date2>
<Date3>1320</Date3>
<Date4>730</Date4>
<Date5>1503</Date5>
<Date6>1094</Date6>
</exemple>
</Exemples>
<Exemples2>
<Header2>
<Date12>INVOICE</Date12>
<Date22>ORDER</Date22>
<Date32>DESADV</Date32>
</Header2>
<exemple2>
<Date12>4670</Date12>
<Date22>3780</Date22>
<Date32>5490</Date32>
</exemple2>
</Exemples2>
</styleSheet1>
<styleSheet2>
<chart1 keysRange="5-5-C-H" valuesRange="6-6-C-H:7-7-C-H:8-8-C-H" aliasValue="INVOICE:ORDER:DESADV" ></chart1>
<chart2 keysRange="5-5-C-H" valuesRange="6-6-C-H:7-7-C-H:8-8-C-H" aliasValue="INVOICE:ORDER:DESADV" ></chart2>
<chart3 keysRange="5-5-C-H" valuesRange="6-6-C-H:7-7-C-H:8-8-C-H" aliasValue="INVOICE:ORDER:DESADV" ></chart3>
</styleSheet2>
</iXDoc>
Format explanation
| Properties | Description | Example |
| bold | The "bold" property can be applied to a column of data to make the style of the cell bold | bold= "true" |
| color | Change a color of a cell | color = "red" |
| italic | The "italic" property can be applied to a column of data to make the style of the cell in italic | italic= "true" |
| AreaRange | The range of the graph position. Example: AreaRange = "3-17-J-Q" Means that the graph must be positioned from the 3rd row to the 17th row, and from column J to column Q | AreaRange="3-17-J-Q" |
| sheet | The sheet where the chart data is located | Sheet = "Datas" |
| chartType | The types of the graph, here is the exhaustive list: - PIE - PIE3D - LINE - LINE3D - BAR (Stacked, unstacked, horizontal / vertical) - BAR3D (Stacked, unstacked, horizontal / vertical) - AREA - SCATTER - RADAR | chartType="LINE3D" |
| horizontal | Applicable for the Bar & BAR3D type graph, this makes the graph horizontal, by default the graph is vertical | horizontal="true" |
| bottomAxisTitle | The wording of the x-axis | bottomAxisTitle="Dates" |
| leftAxisTitle | The label of the y-axis | leftAxisTitle="Flows" |
| legend | The legend of the graph | legend="Number of flows per TYPE (SCATTER)" |
| Stacked | Application for the BAR & BAR3D type graph, this makes the graph stored on a single column. "False" is the default. | stacked="true" |
Input File explanation
| Properties | Description | Example |
| keysRange | The range (The position) of the data keys.Example: keysRange = "5-5-C-H" ==> it Means the data keys are in the 5th row and from column C to column H. | keysRange="5-5-C-H" |
| valuesRange | The range of data values (Separated by ":" if several types of data exist). | valuesRange="6-6-C-H:7-7-C-H:8-8-C-H" |
| aliasValue | Label of the traces, the number of labels must be the same as the number of the row of data. | aliasValue="INVOICE:ORDER:DESADV" |
| hide | Hide a row in the Excel sheet | <exemple Hide="true"/> |
